 As a long time user of photoshop and similar programs (gimp, iphoto, paintshop pro, photoplus etc) I have to say that I spend way too much time editing images. Somehow I have so much fun when altering people's faces and scenes. From subtle lighting elements through to changing the landscape; got a road: change it to grass; powerlines become blue sky; acne is a thing of the past. Sure, the finished product isn't the original image, but I feel that I have contributed to the final output in an artistic sense. So I have made my friends look like aliens, removed hair, added hair, removed creases and spots from scanned photographs, highlighted the hidden subject of an image, blurred, removed and altered junk elements. As far as I am concerned, it is all good.
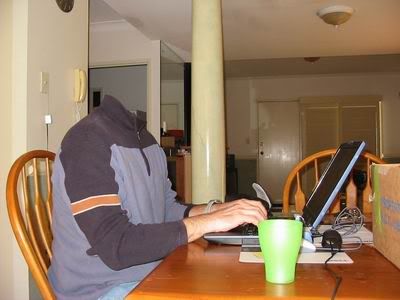
So when I see something cool done with photoshop, I have to wonder how they did it, and sometimes I attempt to replicate the feat. Hence my headless image on the right here was a picture by Josa Jr that was highlighted in Narbenfarkle's blog. Mine isn't anywhere near as good but it is simply a proof of concept for me. Two images, one of you and then another of the garment you are wearing in the same lighting situation. The garment solo is the toughest as you have to have the shirt open up to get the back but without your hands in shot. This would be easier if you have some sort of frame to stick under the shirt - which I wasn't about to do at this stage. Slap both images into Photoshop, select and copy the inside of your shirt and paste onto the other image then carefully erase the shirt insides so it fits around the neck area. Voila!
The pic to the right was easier because I don't look into the shirt. Just two pics. One with you in it, one without. You have to use a tripod (or similar). Open both images into photoshop. Copy and paste the image with you in it on the image without you, then erase away the head bit. You may have some issues with lighting, but this is quite simple to fix. Nice and quick and kinda funky looking.
I highly recommend that anyone with a digitial camera have a look at some of the good books written on editing images, specifically those books that list problems and solutions are the ones that I find best (if you are just beginning then you will want to hunt around for texts that are appropriate for your level).


1 comment:
Sorry I didn't get back to you today Simon - that's awesome! Glad you liked that photo I found on flickr - you've done a good job, although your frags could do with some work in the image you sent me.
Can I suggest a caption: Need head?
Post a Comment